
Summer’s sweetest treat just got easier to make at home

There’s nothing quite like homemade ice cream on a warm summer day, and this blueberry ice cream recipe delivers all the creamy satisfaction you crave without the complexity of traditional custard-based recipes. By skipping the eggs entirely, we can focus on what really matters: fresh blueberries and that perfect balance of rich cream and sweet, fruity flavor.
What Makes This Recipe Special
This isn’t your typical blueberry ice cream. Instead of simply mixing pureed berries into a base, we cook whole blueberries down into a concentrated, jammy sauce that creates beautiful purple swirls and bursts of intense flavor throughout every scoop. The result is an ice cream that tastes like summer itself, with chunks of real fruit and a gorgeously vibrant color.
The secret to the creamy texture lies in the combination of whole milk and heavy cream, which provides all the richness you’d expect from premium ice cream without the need for eggs or complicated custard preparation.
Ingredients You’ll Need
For the Blueberry Sauce:
- 4 cups fresh blueberries
- 1½ cups granulated sugar
- 1 teaspoon ground cardamom (optional, but highly recommended)
- 2 tablespoons water
For the Ice Cream Base:
- 3 cups whole milk, cold
- 1 cup heavy cream, cold
Total yield: About 1½ quarts
Essential Equipment
- Wide, shallow saucepan (helps with faster evaporation)
- Potato masher or large spoon
- Large mixing bowl
- Ice cream maker
- Freezer-safe storage container
Step-by-Step Instructions
Create the Blueberry Sauce:
In a wide, shallow pan, combine blueberries, sugar, cardamom (if using), and water. The wide surface area is crucial here as it allows moisture to evaporate more quickly, concentrating the flavors faster than a deep pot would.
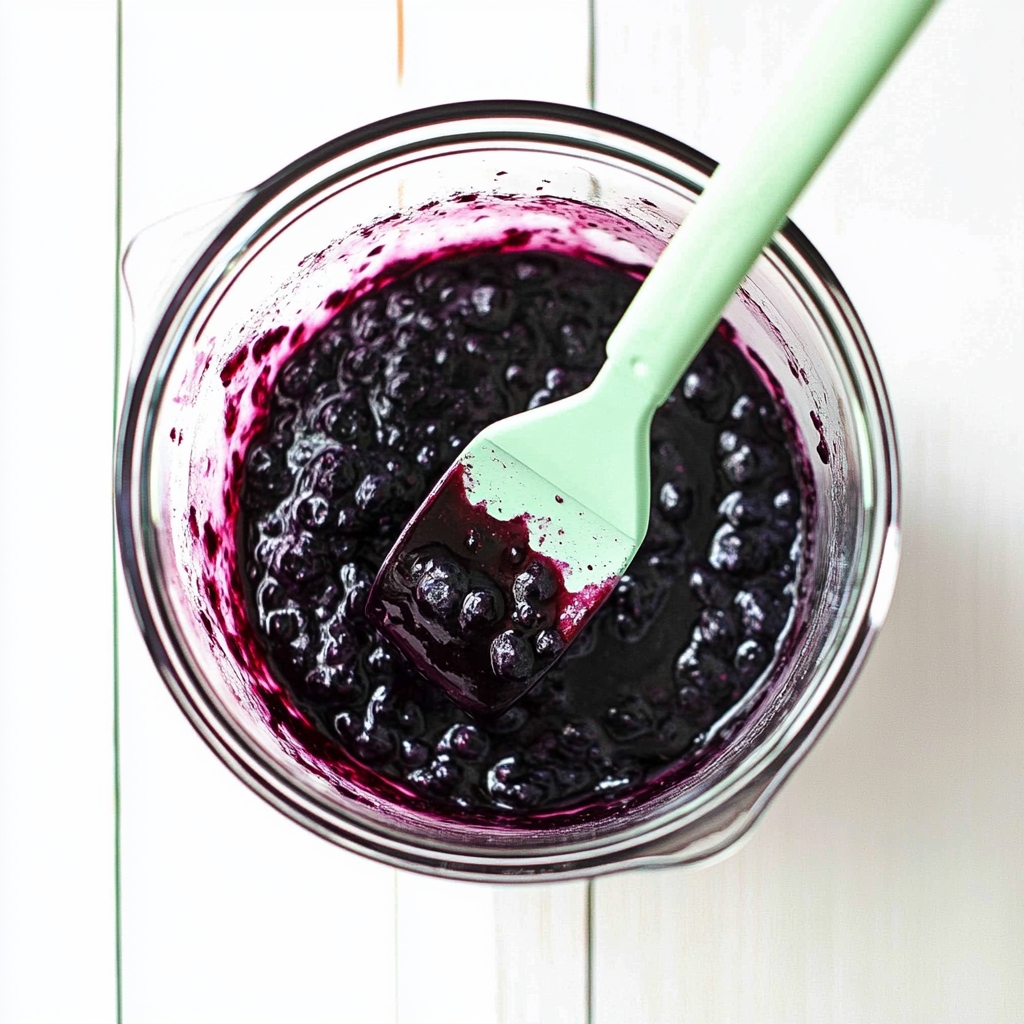
Heat over medium flame, stirring occasionally until blueberries begin to soften and burst open, about 5 minutes. You’ll hear gentle popping sounds as the berries release their juices. This is exactly what you want – those natural pectins and juices will help create the perfect jammy consistency.


Using a potato masher, gently mash the softened blueberries, leaving some chunky pieces for texture. Don’t aim for a completely smooth puree – those little bursts of whole berry will create delightful surprises in each bite. Continue cooking while stirring frequently, making sure to scrape the bottom and sides of the pan to prevent sticking. The natural sugars can burn quickly, so vigilant stirring is key.
Cook until the mixture thickens to a jammy sauce consistency that coats the back of a spoon, about 5-10 additional minutes. The sauce should be thick enough that when you drag a spatula across the bottom of the pan, it briefly exposes the pan bottom before the sauce flows back together. This is your visual cue that it’s ready – the sauce should cling to itself rather than running like juice.

Remove from heat and let cool for at least 15 minutes before proceeding. Cooling is essential because adding hot sauce to cold dairy can cause curdling. While it cools, you’ll notice the sauce continues to thicken slightly as the pectins set up.
Prepare the Ice Cream Base
In a large bowl, measure the cold whole milk and heavy cream. Using cold ingredients from the start helps maintain the temperature throughout the process and reduces overall chilling time.
Slowly pour the cold milk and cream mixture into the cooled blueberry sauce, stirring constantly to incorporate. The mixture will be beautifully purple with visible fruit pieces throughout. Don’t worry if it looks a bit lumpy – this rustic appearance translates to wonderful bursts of flavor in the finished ice cream.


Refrigerate for at least 1 hour, or until completely cold throughout. The mixture needs to be thoroughly chilled for the ice cream maker to work effectively. Don’t worry if the mixture separates during chilling – the different densities of the ingredients cause natural separation. This is completely normal and will be easily remedied with stirring before churning.
Churn the Ice Cream
Ensure your ice cream maker bowl has been frozen according to manufacturer’s instructions, usually 24 hours minimum. The bowl should be so cold that a drop of water instantly freezes on contact. If you can hear liquid sloshing inside the bowl walls, it needs more freezing time.
Give the chilled mixture a thorough stir to recombine any separated elements. The mixture should look uniform and appetizing again. Pour into your ice cream maker, filling no more than 2/3 full to allow for the significant expansion that occurs during churning as air is incorporated.
Process according to your machine’s instructions, typically 20-25 minutes. The ice cream is ready when it has the consistency of thick soft-serve and holds its shape when the paddle is lifted. If your machine has a viewing window, you’ll see the mixture gradually thicken and lighten in color as air is incorporated.

Final Freeze and Storage
Immediately transfer the churned ice cream to a freezer-safe container or metal loaf pan. Work quickly here, as the ice cream is at its most vulnerable temperature and can start to melt rapidly at room temperature.
Cover tightly and freeze for at least 8 hours or until completely solid. The ice cream will continue to firm up and develop its final texture during this time.

Pro Tips for Perfect Results
Cooking the blueberries: Use a wide, shallow pan rather than a tall, narrow one. This isn’t just preference – it’s physics. The increased surface area allows for faster evaporation, which concentrates flavors more quickly and reduces the risk of overcooking. Keep stirring and scraping the bottom religiously to prevent burning, which can introduce bitter flavors.
Managing the mixture: Your ice cream base will expand by about 50% during churning as air is incorporated. This is why you should never fill your ice cream maker more than 2/3 full. Overfilling can cause overflow and mess, plus it prevents proper churning action.
Temperature control: Both your ingredients and equipment temperature matter enormously. Cold ingredients churn better, and a properly frozen bowl is non-negotiable. If your freezer bowl isn’t cold enough, the mixture won’t freeze properly during churning.
Storage optimization: Store freshly churned ice cream in a metal pan for the initial freeze. Metal conducts cold more efficiently than plastic or glass, resulting in faster, more even freezing and better texture development.
Flavor variations: While cardamom adds a sophisticated floral note that complements blueberries beautifully, you can experiment with other spices. A pinch of cinnamon, a splash of vanilla extract, or even a tablespoon of lemon juice can create interesting flavor profiles. For pure blueberry flavor, simply omit the spice entirely.
Serving Suggestions
This ice cream is spectacular on its own, but here are some delicious ways to serve it:
- In waffle cones with a drizzle of chocolate sauce
- As ice cream bars dipped in homemade magic shell coating
- Alongside fresh blueberry pie or cobbler
- With a sprinkle of graham cracker crumbs for a cheesecake-inspired treat
- Sandwiched between sugar cookies for gourmet ice cream sandwiches
Storage and Make-Ahead Tips
Long-term storage: Properly stored in an airtight container with plastic wrap pressed directly against the surface, this ice cream will keep in the freezer for up to 2 months. However, it’s best enjoyed within the first month for optimal texture and flavor, as homemade ice cream lacks the stabilizers that keep commercial varieties fresh longer.
Make-ahead flexibility: The unprocessed base can be stored in the refrigerator for 1-2 days before churning, making this perfect for entertaining. If it separates during storage, simply stir it back together before processing.
Serving temperature: For the best scooping experience, remove the ice cream from the freezer 5-10 minutes before serving, depending on your freezer’s temperature. This slight softening makes scooping easier and allows the flavors to fully develop on your palate.
Have you tried this recipe? We’d love to hear about your results! Share your photos and any creative variations you discovered.

Easy No-Egg Blueberry Ice Cream Recipe
Ingredients
Equipment
Method
- Make blueberry sauce: In a wide, shallow pan, combine blueberries, sugar, cardamom, and water. Heat over medium flame for 5 minutes until berries soften and burst. Mash with potato masher. Continue cooking 5-10 minutes until thick and jammy. Cool 15 minutes.

- Prepare base: In large bowl, combine cold milk and cream. Stir in cooled blueberry sauce. Refrigerate 1+ hours until completely cold.

- Stir mixture well (it may have separated). Pour into ice cream maker, filling no more than 2/3 full. Churn according to manufacturer's instructions, about 20-25 minutes.

- Transfer to freezer-safe container. Cover and freeze 8 hours until solid.

Notes
- Use wide, shallow pan for faster evaporation when cooking berries
- Mixture will naturally separate while chilling – just stir before churning
- Store in metal pan initially for faster freezing
- Keeps frozen for up to 2 months
Browse all my recipes and baking tips at my blog section – there’s always something delicious waiting for you!


Thank you for providing pics for every step. Really easy to follow!